Table of Contents
DataMatrix Encoder GUI provides a fast way to create DataMatrix barcodes on the fly. From the program you can easily create barcode strings or images and transfer them to a graphics designer or word processor.
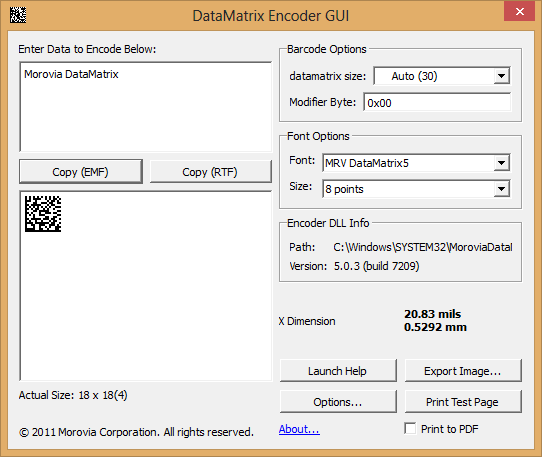
Using this GUI program is straightforward. Enter the data encode in the edit box. The barcode changes as you type. You can change the barcode size by changing the font size. The following lists the major items in the dialog.
- Data to Be Encoded
This is the place to enter the data to be encoded. Multiple-line text is supported. To enter the next line, enter Ctrl+Enter.
- Copy (EMF)
Place the barcode image in the clipboard, so that you can subsequently paste it into another application such as Microsoft Word. The EMF created does not use font, so that you do not need to copy the font file when you view document from another computer.
Note that X dimension in the resulted barcode is determined by the Module Size in the Options dialog, as the EMF format does not use the font.
- Copy (RTF)
Place the barcode string in the clipboard, so that you can subsequently paste them into another application such as Microsoft Word.
Both rich text format (RTF) and text format are placed in clipboard. In applications that are capable of processing RTF (Rich Text Format), you will see a barcode immediately after pressing the button. Otherwise, you will see the text string instead. If this is the case, highlight the whole string and format with “MRV DataMatrix5” font.
- Barcode Info
This section displays the actual size of the bacode. In the dialog above, the actual barcode has a size ID of 5 (20 by 20 modules).
- Launch Help
View the program help.
- Options
Pops up the Options dialog where you can specify additional option for exporting barcode images. See Section 3.2, “Program Options” for more information.
- Export Image
Click on this button to export the barcode into standard image formats such as EMF, SVG, EPS and PNG.
- About
Click on this button to pop up the About dialog. License info is accessible through this link.
- X Dimension
This section displays the X-dimension of the barcode, in units of mils and mm.
- Encoder DLL Info
This section displays the absolute path and the file version of the encoder DLL. This is useful to troubleshooting potential DLL confilicts.
- Font Options
Select the font and size from this section.
- Barcode Options
Specify the size desired. The size is divided into two parts: the left siginiicant byte which indicates the datamatrix size, and a modifier byte that can be used to adjust encoder behavior. The modifier byte is specified through a hexdecimal value. See Appendix C, Size ID Parameter (updated in version 5.1) for more information.
Datamatrix Encoder GUI supports exporting into several standard image formats. The images generated do not contain references to the fonts so that you can move around them without requiring the software to be installed.
EMF. This is the default vector graphics format used on Windows operating system.
PNG. PNG is a bitmap image format widely supported by imaging software. It is the recommended image format for web graphics.
BMP. BMP is the default bitmap format used on Windows platform.
EPS. This format is widely used in graphics design industry. Recommended to use in conjunction with Adobe software such as Adobe Illustrator.
SVG. SVG is an emerging vector graphics format. FireFox 3 supports it out of the box, as well as many drawing programs such as Adobe Illustrator.
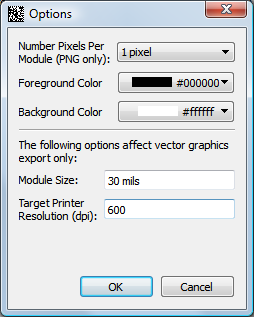
You can specify a couple of options applicable in exporting barcode images.
- Number Pixels Per Module
This option applies on raster images only. Specify the number of pixels of a module (the real estate unit of a PDF417 barcode).
- Foreground Color / Background Color
Specify the color for image background and foreground. Color values are specified using six hexidecimal digits, with the components in the order of red, green and blue. For exmaple 000000 is the value for black color, and ff0000 is the value for red. Note that changing color may reduce the readablity of the barcode.
- Module Size
Apply on Vector image format only. You can specify a nominal size for the module width. You can enter something like "20 mils", or "0.02mm". If unit of measure is not specified, the unit of mils is assumed.
- Target Printer Resolution
Apply on vector image format only. If you export a vector graphic images to a low resolution device such as screen or thermal printer, you should fill this field with the value of the resolution. For screen, use 96. This value makes sure that the length units are properly aligned to the edge of pixels when rasterized.


