
In this article we'll work through creating a local reports application using Morovia DataMatrix fonts. The tutorial is based on Visual Studio 2013; they should work on higher versions such as Visual Studio 2015. The tutorial assumes that you have Morovia Datamatrix Fonts & Encoder 5 installed on the development machine.
An example project using Northwind Access database is attached in this article.
In Visual Studio, select from the menu. Locate template under category. Give a project name and click .
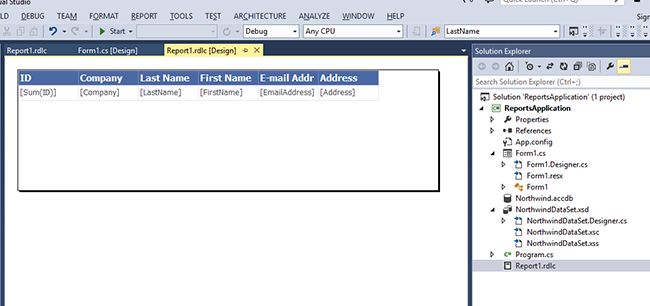
Follow the designer wizard to choose the dataset and the fields in the report. After the wizard is completed, you should get a project as below:
Compile the project and run the program. You should be able to run the program without any errors.
Note
If some dataset field names contain spaces or in a form that is not compliant with CLS identifier rules, you
will receive Field names must be CLS-compliant identifiers.. You need to change the field names manually
in .rdlc file. The designer wizard does not warn on non-compliant field names.
Remember that you cannot just format the string encoded with barcode font to produce a barcode. Instead, the data string must be encoded into a form called “Barcode String” first. The encoder function resides on a DLL written in C++. Unfortunately the report cannot call this DLL directly so we provide a wrapper DLL.
For this tutorial the wrapper DLL is called ReportServicePlugin_DataMatrix5.dll,
located under C:\Program Files (x86)\Morovia DataMatrix Fonts & Encoder 5. If you are using
a different product, refer to the manual for the name and the location of the wrapper.
Started from Visual Studio 2013 the build engine has changed. Because of this change, you need to copy
the DLL to C:\Program Files (x86)\MSBuild\[version]\Bin directory. Replace [version] with the corresponding Visual Studio version, as below:
| Product | Version |
|---|---|
| Visual Studio 2013 | 12.0 |
| Visual Studio 2015 | 14.0 |
| Visual Studio 2017 | 15.0 |
Now add the assembly to the project reference by right clicking on the project and select → . With this step the assembly is copied to output directory every time that the project is built.
Click on Report1.rdlc to switch to report design view. Select from menu. Click on Reference and add the reference to the custom assembly.
Now right click on the header of the last column and insert a column on the right. Right click on the text box just created, and select Expressions. Change its value to:
Morovia.ReportService.DataMatrixV5.DataMatrixEncode(Fields!LastName.Value,-1)
You can use the builtin operators and functions to pass more complicated string to the encoder function.
Now you can build the project. However, when you run the report, you will see #Error in the new column.
The .Net framework changed the security model.
First open App.config, add the following content just before ending configuration.
  <runtime>

    <!-- enables legacy CAS policy for this process -->

    <NetFx40_LegacySecurityPolicy enabled="true" />

  </runtime>
In Form1.cs file, inside Form_Load method, add
#pragma warning disable 618
  this.reportViewer1.LocalReport.AddTrustedCodeModuleInCurrentAppDomain(
   "ReportServicePlugin_DataMatrix5, Version=1.0.4191.23800, Culture=neutral, PublicKeyToken=null");
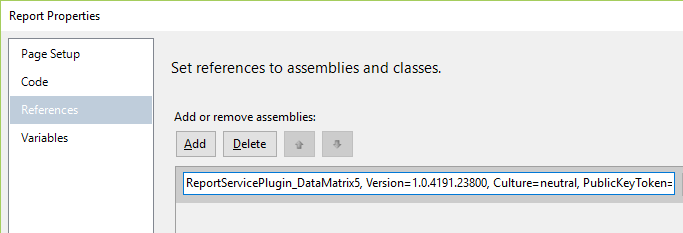
Note that the parameter must match the custom assembly string. In order for the string to be exact, click on Report Properties/Reference to view the assembly reference string.
Build the project and run again. You should see the barcode string in the new column. Go back to the report
designer. Right click on the text box and select Textbox Properties/Font. Change the font MRV DataMatrix5 and font size 6pt. Build the project again.
Download the sample project here.