
This article demonstrates how to add linear barcodes (Code39, Code128, UPC_A etc.) to Microsoft Reporting Service. The method described here uses the font-based approach. Deployment is also included.
Microsoft SQL Server Reporting Service has gained momentum in enterprise reporting market. SQL Server Reporting service includes a Report Designer and Report Server. The Report Designer works with Visual Studio 2003 and 2005, allowing developers to quickly design and deploy a report.
Before adding barcodes into report, you need perform several preparation tasks - compiling and installing custom assembly that provides the barcode functionality.
The source code is attached
and can be downloaded here.
The zip file includes two C# files, and a VS2003 project file. After building the project,
you will get the DLL file
named MoroviaFontRSPlugIn.dll. We recommend
that you keep the file name intact.
For Reporting Service 2000, copy the DLL into the following two directories:
Report Designer Folder:
[Program Files]Microsoft SQL Server\80\Tools\Report Designer.Deploy folder
[Program Files]Microsoft SQL Server\MSSQL\Reporting Services\ReportServer\bin.
If you are using Reporting Service 2005, copy the DLL into the following directories:
Report Designer Folder:
[Program Files]Microsoft Visual Studio 8\Common7\IDE\PrivateAssemblies.Deploy folder
[Program Files]Microsoft SQL Server\MSSQL\Reporting Services\ReportServer\bin.
If you have multiple SQL Server instances, you will have multiple MSSQL.n directories. Locate the one that the Reporting
Service is installed under.
Warning
The computer must also have the fontware product installed. For example, if you are creating UPC-A barcodes, UPC/EAN/Bookland Fontware must be present in the same computer.
Simply formatting the text with a barcode font won't produce a readable barcode. Most barcode formats require start and stop characters that tell the scanner where to start and stop. Additionally some barcode formats add checksum characters at the end to ensure the data integrity. To create a valid barcode, you need to call an encode function to get the barcode string (which adds start, stop and checksum characters), and format the latter with barcode font. You also need to determine which font and the font size for your application based on requirement.
The name of functions are the same as the ones in other packages, such as Windows DLL version. All functions take one input argument (the data to be encoded), and return the barcode string. Characters that can not be encoded with the symbology selected are removed. If a symbology requires fixed length of input, the excess will be truncated if the input's length exceeds the required length, or zeroes are appended to the end of the input if too short.
For more information about the encoder functions, see KB#10011.
In this tutorial, we add a column called barcode,
which encodes the table column CustomerID in Code128 format.
Function Code128Ex is used to make barcodes
as short as possible.
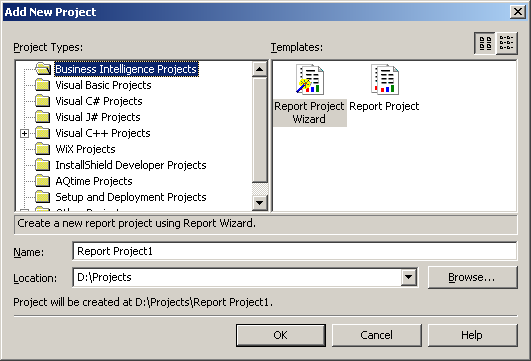
If you are adding barcodes into an existing project, skip to step 8. Now we start a new project. In Visual Studio, select → . In the Project Types list box, click on Business Intelligence Projects. In the Templates box, select Report Project Wizard. Give the project a name and click .
On the next screen, the Report Wizard asks for the data source. For simplicity we use the
NorthWinddatabase here, which is installed by default when installing SQL Server. You can type the connection string in the edit box directly, or you can have the wizard fill out for you by clicking the and select the appropriate choices from the Data Link Properties dialog followed.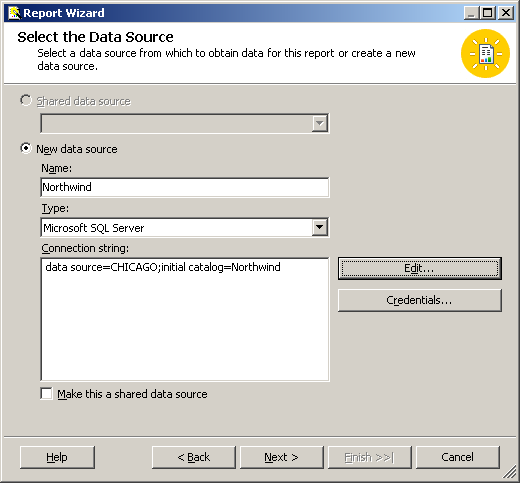
After you finish constructing the connection string, click .
At this step, the Report Wizard asks for a query string which will be used to populate the data set in the report. You can enter something like
Select * from Customers; or you can click on to pop up Query Builder to build the query. Make sure that you includeCustomerIDin the result set.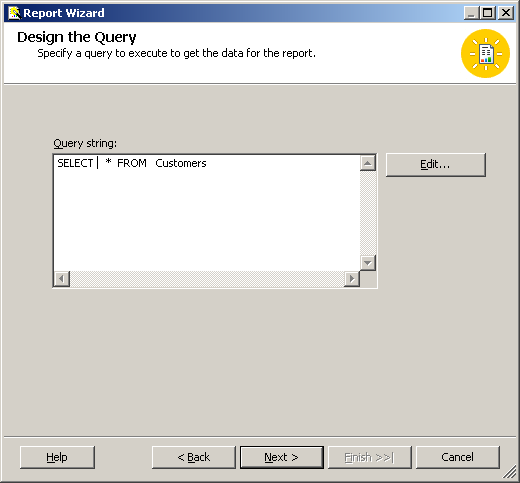
Next, select the type of the report (tabular or matrix). Click .
Now select the fields which will be displayed in the report. In the Available fields list box, use your mouse and CTRL key, select CustomerID, CompanyName and ContactName fields. Move them to the right.
Follow the instructions to complete the wizard.
On the left side, switch to Solution View. Expand Reports node to find the report just created. Double click on the report file name to bring it up to the right side. You will notice that three tabs appear on the right view, and the current position is at Layout tab. In the report, a field name is expressed something like
Fields!CustomerID.Value.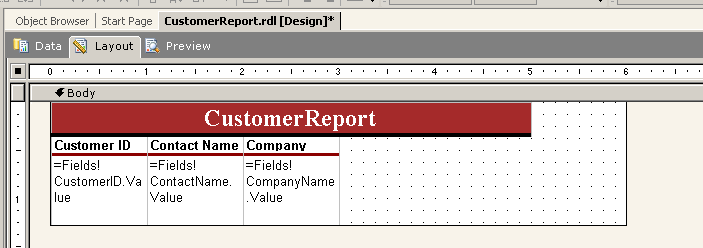
We now add a new column to hold the barcodes. Click on the
Companyheader column once, the report responds by showing a header row on the top. Right click on the header row, and select at the right. Give the new column a nameBarcode.To define the value for the column, you need to tell that you are going to use the the assembly from Morovia. When the current view is the report, the Report menu is visible on top of Visual Studio. Select followed by to bring up the Report Properties dialog.
Click on the Reference tab. In the top list box, click on the ...button. Click on button once to locate the assembly:
MoroviaFontRSPlugIn.dll.Click on the General tab. Move the cursor to the Value edit box. Enter the following:
=Morovia.SupportTools.ReportService.FontEncoder.Code128Ex(Fields!CustomerID.Value)
The last part of the definition is the function name.
Click on the Font tab. From the font list, select
MRV Code128S.Click on the Preview tab to view the report. The report should show as below:
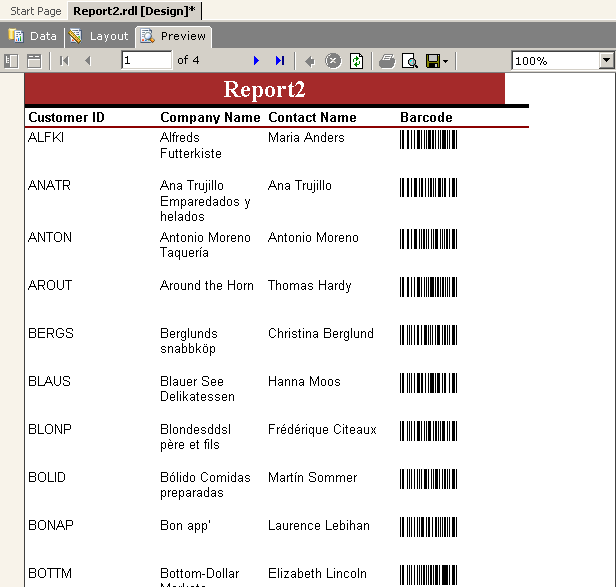
If you see a different shape rather than a rectangle, or just portions of a barcode, the width or the height of the column is too small for the barcode. Go back to the Layout view and use your mouse to make appropriate adjustments.
After you are satisfied with the report, click → , to deploy the solution to the Report Server. However, do read the deploy section in this article before you proceed with viewing report from your browser.
When there is an encoding error, for example, the data is too large to be encoded in the size specified, the function returns an error message in the place of the barcode. If an irregular barcode appears while there are enough spaces for the barcode display, most likely an error occurred. If that is the case, format the field with a text font and examine the message. If the size specified is too small, set a size that is capable of encoding the whole data, or set it to 0 for automatic size selection.
The Reporting Service require any custom assembly defined in the security policy otherwise a run-time error will be thrown and all you get is #Error without any explanation. Follow the steps below to change security policy. Two security policy files are required to change:
RSPreviewPolicy.config. This policy file is used forDebugLocalpreview in Visual Studio. This file is located in the Report Designer folder which is[Program Files]Microsoft SQL Server\80\Tools\Report Designerfor RS2000 and [Program Files]Microsoft Visual Studio 8\Common7\IDE\PrivateAssemblies for RS2005.rssrvpolicy.config, the policy file used for running Report Server. The file is located under[Program Files]Microsoft SQL Server\MSSQL\Reporting Services\ReportServer\bindirectory.
Perform the following steps to add security policy required to run custom assembly:
Open
RSPreviewPolicy.config, and add the following content at the end (just before two endingCodeGrouptags):<CodeGroup class="FirstMatchCodeGroup" version="1" PermissionSetName="FullTrust" Name="MoroviaFontRSPlugIn.dll" Description="MoroviaFontRSPlugIn.dll"> <IMembershipCondition class="UrlMembershipCondition" version="1" Url="C:\Program Files\Microsoft Visual Studio 8\Common7\IDE\PrivateAssemblies\MoroviaFontRSPlugIn.dll" /> </CodeGroup>
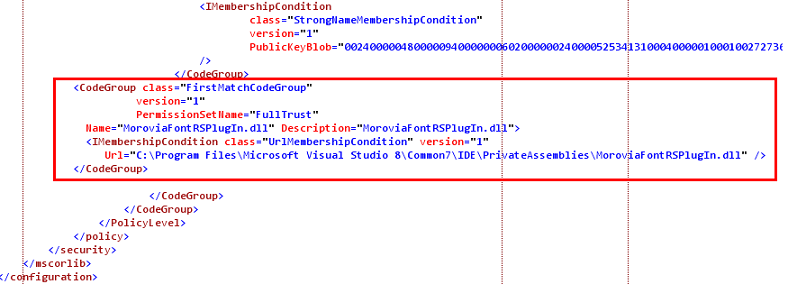
Note that on RS2000 the custom assembly is located in a different directory.
Save the file. In Visual Studio, change the active configuration to
DebugLocaland run the report. You should see the barcodes on the report. Examine the contents in the Output window.If you see message A first chance exception of type 'System.Security.SecurityException' occurred in mscorlib.dll, the security is not configured properly.
After you have successfully run the report under
DebugLocalconfiguration, publish the report to the Report Server. Openrssrvpolicy.configand add similar lines.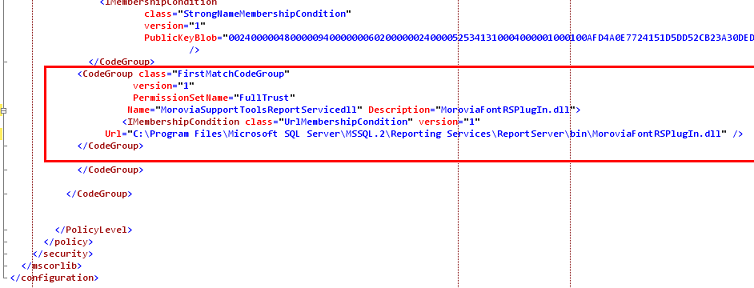
Note that you may change the file path if it is located in a different location.
Restart SQL Server Reporting Service and browse the report. You should see the barcodes on the report this time.