Table of Contents
To insert a QR Code symbol into Office document, you can create the barcode in QRCode Encoder GUI and transfer it through clipboard. In Word, you can also use the Word AddIn included in the software. Either way, you can't change the barcode because the barcode image does not have the information of the data encoded. If you need to create QR code images on the fly in a Microsoft Office program, you can select either ActiveX control or font-based. It depends on the exact situation - in some cases ActiveX control based is better and may be the only solution supported; and in other cases font-based solution is better. In this chapter we'll overview several typical scenarios.
Microsoft Office programs, including Word, Excel and Access, can not call DLL functions directly. Instead, you need to import the VBA module included into your document first. This module adds function to create barcode string of a QR code.
Table 6.1. List of VBA Functions
(Morovia.QRCodeFontDLL5.bas)
| Function Prototype | Font to Use | Comment |
|---|---|---|
QRCodeEncode(DataToEncode As String, _ Optional versionID As Long=0, _ Optional ecLevel As Long=0) As String | MRV QRCode | Returns the barcode string that with DataToEncode encoded. |
Note that the version and error correction level parameters are optional. So you can call the function as below:
barcodestr = QRCodeEncode("this is data")To import the QR code VBA module, perform the following steps:
In Office 2003, Select → → to launch Visual Basic Editor. In Office 2007 and above, first enable developer tab if you can't see it. Then click on Developer tab followed by Visual Basic.
Choose → . Navigate to QRCode Fonts & Encoder installation folder, by default
c:\program files (x86)\Morovia QRCode Fonts & Encoder 5[3], and selectMorovia.QRCodeFontDLL5.bas.Close Visual Basic Editor and save the file.
After the VBA is imported successfully, formula
QRCodeEncodeis available to use.
QR Code can be crated in a mail merge word document from a data source. Note that in order for the barcode properly created, you should have the access to the data source to add an extra field that holds the barcode string. You can't just pull a field and format it with the font. This tutorial assumes an Excel data source.
Import the VBA module into the Excel spreadsheet, as described in Section 6.1.1, “To Import VBA Module”.
Given each column a title on row 1 if you have not done so. With this you can refer a column with its title, instead of cell reference such as $A$1.
At the right side choose a blank column and at row 1 give it title
barcodestring.Add a formula on row 2 of the
barcodestringcolumn that calls the function of the formula. For example, to create QR code on column A2, enterQRCodeEncode(A2, 0, 0).After pressing enter, you should see the cell filled with a string with hexadecimal characters. Highlight this cell and choose → (Ctrl+C).
Select the entire range of cells in
barcodestringcolumn to paste this formula and choose → (Ctrl+V).Follow the procedures in Word to add this spreadsheet as the data source and pull the merge fields into Word document, including
barcodestringfield.Highlight
«barcodestring»merge field and selectMRV QRCodefont.Click on the button to display merged document. The QR code should appear in the merged document. Adjust font size to adjust the barcode size.
Tip
If you saw blank lines inside barcode, highlight the field and select paragraph. Set spacing After and Before to
0, and Line spacing toSingle/1.0.
A working example is provided in the software. See Word-MailMerge.doc and MailMerge-Data-Source.xls for details.
It is straightforward to use QRCode ActiveX control in Word, and Excel. You can bind the data encoded to a cell in Excel, or change the QRcode by editing properties.
You insert QRCode ActiveX control into Word/Excel documents through Insert Control command. First, make sure the control toolbox toolbar appears somewhere over the window by check the option from View | Toolbars.
At the right bottom of the Control Toolbox, click on the More Controls icon. From the pop-up menu, scroll all the way down and select Morovia QRCodeActiveX. The cursor turns into a cross-hair icon. Click on the place you'd like to place the object and drag the mouse down to draw a rectangle. Release the mouse. The barcode control now appears on the document. The barcode object fills the rectangle you just drew.
The QRCode ActiveX object does not offer menus or toolbars for you to do the interactive editing. Instead, you can edit the barcode object by modifying the properties. The property window is accessible by right clicking on the barcode object and select .

If you are familiar with Visual Basic, you know that it is the same property sheet appearing in the Visual Basic when placing the Barcode ActiveX into a form.
When creating the object in Excel, Excel adds the property LinkedCell
in the property list. This additional property links the Message property
to a cell. For example, to make the barcode data bound to cell G4, enter G4
in the LinkedCell property entry.

You can use either ActiveX control or QRcode font in Access reports.
You can find example files Accesss Example (DLL).mdb and Access Example (ActiveX).mdb under
the installation directory, which demonstrates the two approaches.
A major improvement in 5.1 release is InfoPath support. Now you can add QR code easily to an Infopath form and bind the control to a field.
Follow the steps below to add QRCode Control to Custom Controls. You only need to perform this step once.
Make sure that you are in Design Mode. You can activate the Design Mode by clicking on the triangle symbol

in the Standard toolbar, or select → (Atl-T+M)
Open the Task Pane if it is not visible by → (Ctrl+F1).
In the Task Pane, click on Controls...
At the bottom of the Controls task pane, click Add or Remove Custom Controls.
In the Add or Remove Custom Controls dialog box, click . From the wizard, select ActiveX Control, followed by Morovia QRCodeActiveX.

On the next page, leave Don't include a .cab file selected. Click .
In Specifying a Binding Property list, click on the Text property.


Note: Forms templates designed to be opened in a browser can't contain ActiveX controls. If you saw a warning message that ActiveX control can't be used in this template, uncheck Design a form template that can be opened in a browser or InfoPath option. This option is accessible through → → .
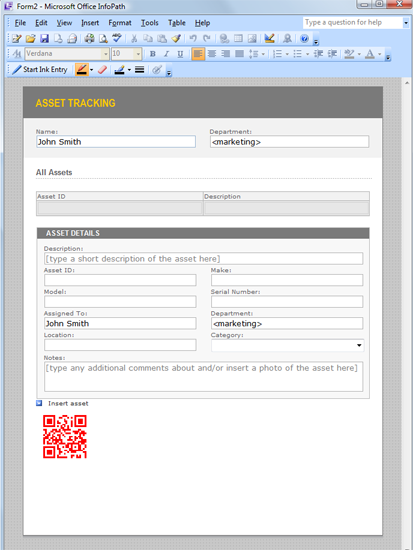
After you added QRCode control to the Custom Controls in Microsoft InfoPath, you can add a barcode to form template.
Adjust or resize the form to create space for the control. Drag the control and drop to the place. A small barcode will appear at the place.

Right click on the control. From the menu you can change the binding to another field on the form using Changing binding... To change the appearance of the barcode, select Morovia QRCodeActive Properties... Click on QRCodeCtrl Properties tab.
There are a number of properties to change. Here we click on ForeColor edit box and change the foreground color to red. Click on ModuleSize edit box and change it to
40 mils. Properties changed have their values displayed in crimson color. Click on the to apply the changes. The barcode on the design form changed accordingly.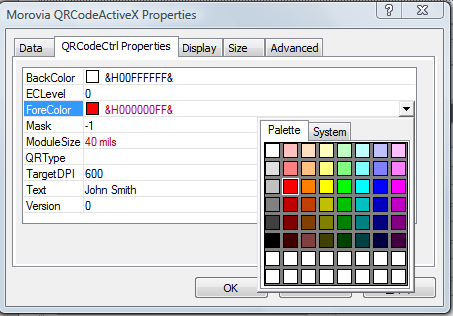

After saving and/or publishing the modified form, the barcode should appear. The barcode field will be automatically updated after that field is edited and the cursor is moved to another field.