You can download the fonts to the printer by writing some code. On the other hand, in many occasions you might want to do it under command prompt or in a shell environment. The downloading involves three steps:
Designate a Font ID to the soft font. The Font ID should be unique among all soft fonts.
The PCL command to use is
<esc>*c#D, while#is the decimal value of the Font ID.Send the actual soft font.
Make the font permanent by sending PCL command
<esc>*c5F.
Step 1 and 2 must be carried out in one connection. If for some reason they can not be sent together in one command line, you need to merge data into one file and send this file instead. We'll explain how to achieve this soon.
There are several methods to send the data above to the printer, depending on the platform and connection choice. For example, if the printer is directly connected to a computer via a parallel port, or the printer is shared among a Windows network, you can use copy to send data to the printer. If it is a network printer connected to a TCP/IP network, you will need to use lpr command.
In preparation of downloading the soft font to your printer, consider that the number you will assign as the font ID. Each soft font must have an unique number associated. Any font with the same ID overwrites the previouse one.
In the example we provided, we put the font ID command in file C80D.txt. Another file c5F.txt contains the command for step 3.
On Windows you can use copy/b command to send data to printer.
c:\> copy /b C80D.txt +mrvcode39_4pitch.sfp +c5F.txt LPT1:
If your operating system is DOS which only supports 8.3 file format, you need to shorten the file name before running the command.
If the destination printer is on the network, use the printer's
network name in the place of LPT1.
For example, the following command sends the font
to a network printer which is shared as HPLaserJon computer Chicago:
c:\> copy/b C80D.txt +mrvcode39_4pitch.sfp +c5F.txt \\Chicago\HPLaserJ
On UNIX and LINUX platforms, you can use cat command to copy file to a raw device.
For example, the following command sends the font file to printer:
#cat C80D.txt +mrvcode39_legacy_4pitch.sfp +c5F.txt /dev/lpt1r
Here, /dev/lpt1r refers to the printer
connected to the LPT1 port. The r means raw device.
When the printer is connected to a TCP/IP network directly, the best method
is to send commands through lpr command. A TCP/IP device
may be identified with a full qualified DNS name, or an IP address.
In our test lab, we assigned our network printer a fixed IP address 192.168.1.22, and we use this address in the examples below.
In lpr manual page, it is also referred as Printer Name.
Another name you will need is Queue Name.
The queue names are
names assigned to the “processors” in the print server. Most
print servers and network printers have hardcoded queue names.
Some allow you to define your own queue. On HP JetDirect printer servers,
the raw PCL queues are named as raw, raw1, raw2 and raw3. In test files we
use raw as the queue name.
Note that lpr command only accepts 1 file at a time. However, the step1 and step2 commands must be sent in one stream, otherwise the printer will discard them altogether. As a result, you will need to merge these three files into one first. On Windows, you can use copy command:
copy /b C80D.txt +mrvcode39_4pitch.sfp +c5F.txt total.bin
On Linux/Unix platforms, use cat command:
cat c80D.txt mrvcode39_4pitch.sfp c5F.txt > total.bin
Now we can send these files (Windows):
lpr -S 192.168.1.22 -P raw -ol total.bin
lpr -S 192.168.1.22 -P raw -ol data.txt
You need to replace the ip address, the queue name and the file name with the appropriate ones in your environment.
On Linux/UNIX platforms, things are more complicated. The configuration
varies from platform to platform. Generally you need to set up the printer first.
On RedHat Linux, this can be done using printtool. You
assign a printer name (queue name) in the configuration, and you use this name
in lpr command. Assume that the name is HPPrinter, the lpr command
on RH Linux becomes:
lpr -P HPPrinter -o raw total.bin
lpr -P HPPrinter -o raw data.txt
Normally if the printer has sufficient memory, the download will be successful. You usually won't need to worry about the memory issue. To verify that the font is residing in the printer, you can write some code which selects the font and prints a couple of lines of text. High end printer model usually has a LCD control panel that provides a way to print the PCL font list. If a LCD panel is on the printer, you can do the following to print a PCL font list, and check the font name against the list:
Press the ENTER/MENU key on the control panel.
Use the > or < key to select Reports and press ENTER/MENU.
Use the > or < key to select and press ENTER/MENU. The printer exits the Menu settings and prints the list.
Although soft fonts can survive many PCL commands, they are residing in the RAM area, not the ROM. Therefore they are not able to survive a power loss. Thus, it is a good idea to download the font at each printing job. Our font size is very small (1K ~ 10K) and downloading only takes approximately 1 second. Each time the font downloaded will automatically overwrite the one downloaded earlier if the two fonts share the same Font ID.
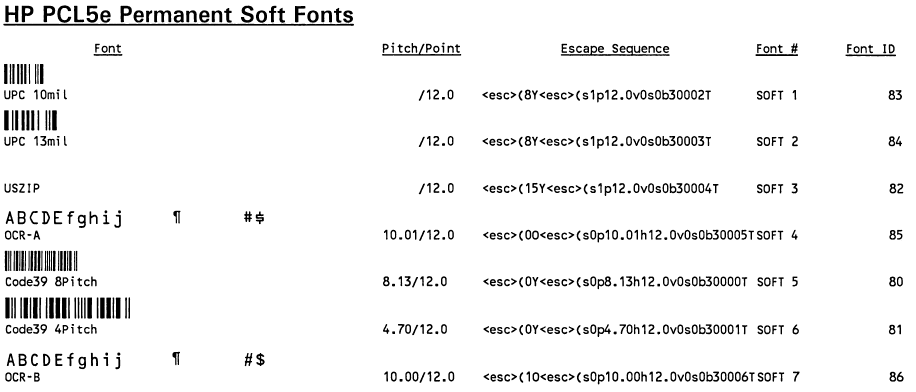
The image below is taken from the actual print out on a HP LaserJet 2300 model.
 |