Table of Contents
Morovia Barcode ActiveX has been tested on three major Microsoft Office applications - Word, Excel and Access. This section outlines several things you need to pay attention to when using Barcode ActiveX in Microsoft Word and Excel. For working in Access, see the following chapter.
Warning
To edit OLE control property through its grid interface, Word/Excel 2003 and above is required. Previous version can open the document with OLE control embedded but can not modify properties of the control.
When you open an office document with Barcode ActiveX embedded, the program may pop up a Security Warning dialog box advising that the document contains macros. The ActiveX control is treated as a kind of macro. To enter the document you need to click on the button.
To modify the ActiveX control properties and position, you need to
activate the design mode. When the design mode is not active, the ActiveX
control appears static and locked. The current mode is identifiable through
the small Design Mode icon ![]() on the control tool box. If this icon appears sunken,
you are working under the Design Mode. Before you start, make sure that the
control tool box appears.
on the control tool box. If this icon appears sunken,
you are working under the Design Mode. Before you start, make sure that the
control tool box appears.
From the , select . On the pop-up sub-menu, make sure that the Control Toolbox is checked. If it is unchecked, check the option. The Design Mode icon appears at the top left of the Control Tool-box.
If the Design Mode icon is sunken, you are already under the Design
Mode. Otherwise, click on the ![]() icon on the control tool box.
icon on the control tool box.
There are two methods to insert a Barcode ActiveX object into an office document: Insert Object command and Insert Control command.
After the Barcode ActiveX object is inserted into the document, you can treat it like any OLE object. You can also write VBA script to manipulate the properties, invoke methods and respond to events.
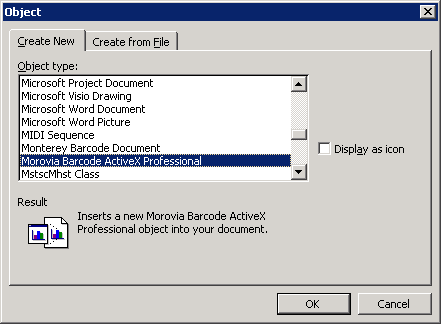
We recommend that you use this method when working with Barcode ActiveX object. From menu, select the command. From the object type selection list, select Morovia Barcode ActiveX Professional and click .
Another method to place the Barcode ActiveX object into an office document is to use the Insert Control command. First, make sure the control toolbox toolbar appears somewhere over the window by check the option from View | Toolbars.
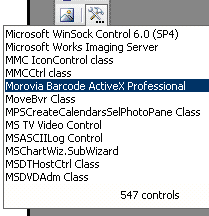
At the right bottom of the Control Toolbox, click on the More Controls icon. From the pop-up menu, scroll all the way down and select Morovia Barcode ActiveX Professional. The cursor turns into a cross-hair icon. Click on the place you’d like to place the object and drag the mouse down to draw a rectangle. Release the mouse. The barcode control now appears on the document. The barcode object fills the rectangle you just drew. You might want to adjust the rectangle to reflect the natural size of the control. See Section 7.5, “Controlling Size” for details.
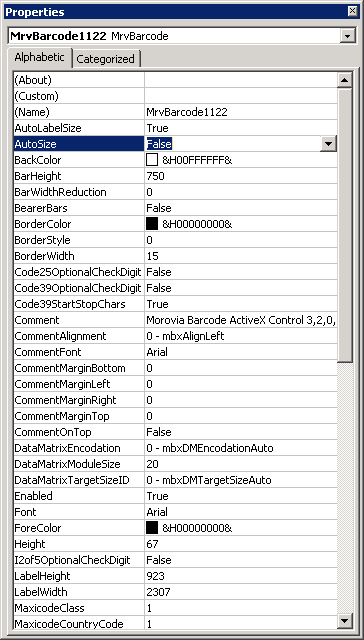
The Barcode ActiveX object does not offer menus or toolbars for you to do the interactive editing. Instead, you can edit the barcode object by modifying the properties. The property window is accessible by right clicking on the barcode object and select .
If you are familiar with Visual Basic, you know that it is the same property sheet appearing in the Visual Basic when placing the Barcode ActiveX into a form.
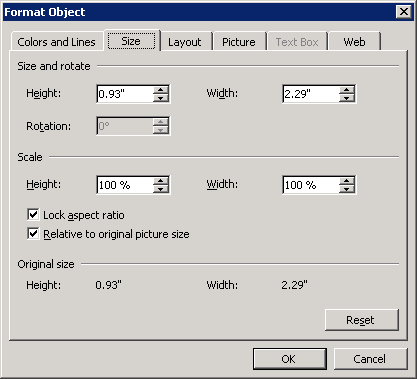
Microsoft office applications treat a drawing object as if it can be scaled up and scaled down indefinitely without impacting the fidelity. This assumption does not hold true in every real world scenario. After all, the barcode must be readable in most cases. If the barcode image is too small, it can not be picked up by a scanner.
When you scale the drawing under the Design Mode, Office programs automatically adjust the bounding rectangle and scale the drawing without notifying Barcode ActiveX object. The property ZoomRatio still reports 1.0.
We recommend that you do not scale the drawing by enlarging the bounding tracker box. If you need to change the size, do so by modifying the object properties.
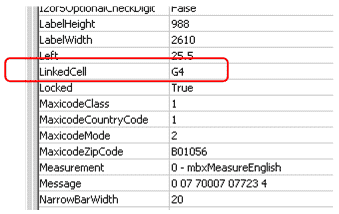
When creating the object in Excel, Excel adds the property LinkedCell
in the property list. This additional property links the Message property
to a cell. For example, to make the barcode data bound to cell G4, enter G4
in the LinkedCell property entry.
Bar-coding in Microsoft Office becomes quite easy with Morovia Barcode ActiveX. On the other side, you should understand the limitations imposed by Microsoft Office. Microsoft Office applications draw the barcode images in Windows metafile format, with the assumption that images can be transferred without loss on any devices. At the time of print, the metafile is scaled to match the printer resolution. As previously analyzed, this means transferring an image targeting high resolution device to printer. To make sure that the barcode printed has a high quality, use a printer with at least 300 dpi in resolution.
Note
If you must use Office programs to print labels on low resolution
printers, we recommend that you select a Magic Number to the property NarrowBarWidth. For example, on a 203-dpi Zebra
printer, setting 15 to NarrowBarWidth produces better quality barcodes than 13. Using magic numbers reduces the overall rounding
errors.
Microsoft Word and Excel caches type libaries of OLE controls that
are embedded into the documents. The cache file has an extension of exd.
If you are upgrading from an earlier version to 3.4,
you may find that GS1 DataBar symbologies do not appear in the list when you
format the control in Word and Excel. The reason is that Word and Excel still use
the cached type library. To force them to use the new version, locate
MrvBarCd.exd (professional version), or MrvBarLt.exd (lite version) on your
hard drive and delete the file. The file is usually located under the following
directories: C:\Documents and Settings\username\Local Settings\Temp\Word8.0 or C:\Documents and Settings\username\Local Settings\Temp\Excel8.0.
Note that the name of the last directory can be something else like Word9.0,
depending on the program version.
For more information, see OFF: .Exd Files Are Created When You Insert Controls.


