Table of Contents
Because this is a font-based solution, you can always create barcodes in Morovia DataBar Encoder GUI, and paste the text into Microsoft Office. This works fine if you just want a couple of barcodes in the document. In many cases, however, it is desirable to have the barcode appear automatically and change when the data changes. This chapter explain how to.
Same as other barcode fonts, you can just enter your number and format it with the font to create a barcode. The barcode created is always unreadable. You need to get the barcode string first, and format the latter with the font in order to create a valid barcode.
Microsoft Office programs can not call DLL directly. Therefore we provide a VBA module that can be integrated into the applications. The functions exported from this VBA module call the DLL at the back-end. In order for these functions to work, the encoder DLL (DataBarFontEncoder.dll) must locate in the search path.
Warning
On Microsoft Office 2003 and later versions, you must enable macro so that they can call VBA functions. In Office 2003, you need to set macro security to medium or low. In Office 2007, macros can be enabled on program basis.
The VBA module support the following functions:
Table 5.1. List of VBA Functions
(Morovia.DataBarFontDLL.bas)
| Function Name | Font to Use | Comment |
|---|---|---|
| Code128_Uni(DataToEncode As String) As String | MRV DataBar 34X | Returns the barcode string that becomes Code128 barcode for
data DataToEncodeafter being formated with a Morovia
DataBar Font. |
| EAN128_Uni(DataToEncode As String) As String | MRV DataBar 34X | Returns the barcode string that becomes GS1-128
(UCC/EAN-128) barcode for data DataToEncodeafter being formated with a Morovia
DataBar Font. |
| DataBar14(DataToEncode As String) As String | MRV DataBar 34X [a] | Returns the barcode string that becomes DataBar-14 barcode
for data DataToEncodeafter being formated with a Morovia
DataBar Font. |
| DataBarLimited(DataToEncode As String) As String | MRV DataBar 13X | Returns the barcode string that becomes DataBar Limited
barcode for data DataToEncodeafter being formated with a Morovia
DataBar Font. |
| DataBarStacked(DataToEncode As String) As String | MRV DataBar 13X | Returns the barcode string that becomes DataBar Stacked
barcode for data DataToEncodeafter being formated with a Morovia
DataBar Font. |
| DataBarStackedOmni (DataToEncode As String) As String | MRV DataBar 34X | Returns the barcode string that becomes DataBar Stacked
Omnidirectional barcode for data DataToEncodeafter being formated with a Morovia
DataBar Font. |
| DataBarExpanded(DataToEncode As String, symbolsPerRow As Long) As String | MRV DataBar 34X | Returns the barcode string that becomes DataBar Expanded or
DataBar Expanded Stacked barcode for data DataToEncode after being formated with a Morovia
DataBar Font. DataBar Expanded is a subset of DataBar Expanded
Stacked. Set SymbolsPerRow to 0 or 22 creates DataBar Expanded
barcodes. |
| Mod10(data As String) As String | N/A | This function calculates modulo 10 check digit based on the
input data, and returns the original data with check digit
appended. This function can be used to create full string for
UPC-A, EAN-13 and GTIN numbers. |
[a] To create a DataBar Truncated Barcode, use the same
function but format the result with font | ||
Before we can create barcodes in Access, we must import the required module.
On Access 2003 and earlier versions, choose → . Navigate to the installation directory
c:\program
files\Morovia\DataBarFontware1.0
and selectAccesss Example.mdb.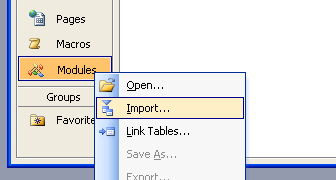
On Access 2007, choose . On the toolbar, select to open Visual Basic Editor window. Choose → . Navigate to the installation directory
c:\program
files\Morovia\DataBarFontware1.0
and selectMorovia.DataBarFontDLL.bas. Close Visual Basic Editor after done.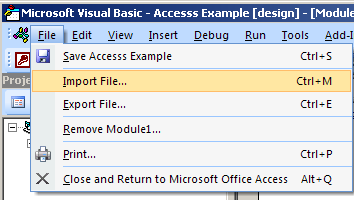
Choose the module to import from the other database; this module should be named
Morovia_DataBarFontEncoder_Module. After it is properly imported, it will appear as one of the modules in the database.If you are working in Access 2007, the above
Open a report in design view and add a text box to your report. The text box will be modified to contain a barcode.
Right click on the text box and choose properties.
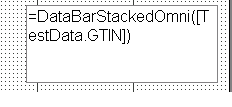
Place the formula
=DataBarStackedOmni([TestData.GTIN])in the control source property of the text box whereTestDatais the table andGTINis the field that contains the data you want to barcode.
Run the report. You should see that the formula changed the data from the database and appended additional characters at the beginning and ending of the text. You may notice that the string is completely meaningless with a series of low case letters. This is normal for DataBar barcode strings.
Open a report in design view, select the text box and choose
MRV DataBar 34Xas the font and choose 12 for the point size of the font.Size the text box so it is large enough to contain the entire barcode. You will need to adjust both the height and width. Be sure to leave some extra space to the right and left of the barcode on the report.
Save the report. Click to run the report. You should see the barcodes appear on the report.

Note
Microsoft Excel does not properly handle the line spacing required for creating DataBar Expanded Stacked and DataBar Stacked Omnidirectional symbols. You might want to consider using an ActiveX control based solution such as Morovia Barcode ActiveX. You can still use Excel as a back-end database and print the barcode using Mail Merge.
Before we can use the VBA functions, we must import them into the spreadsheet. First we need to open Visual Basic Editor.
In Excel 2003 and earlier version, chose → → .
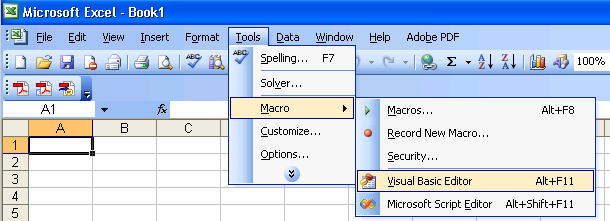
In Excel 2007, select and click on button on the toolbar.

In Visual Basic Editor, Choose → and select
Morovia.DataBarFontDLL.basfrom the list of files. After this module is imported, it will be visible in the list of modules. Choose → and return to Excel.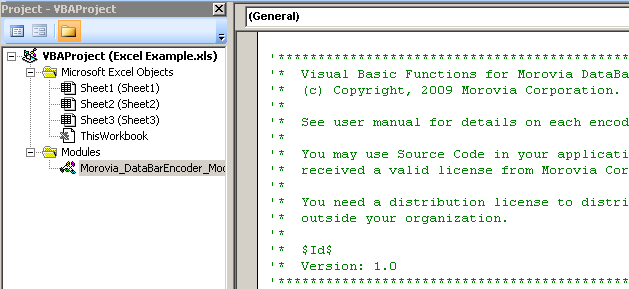
In the spreadsheet, choose the cell that you want the barcode appear, and enter the formula of
=. Here,DataBar14(A2)A2is the cell that stores the data, and DataBar14 function indicates that the final barcode is a DataBar-14 one.
Now you should notice that the content of the cell turned into some illegible string such as
a1a3a1b1f1b3h1a1d1.... This is normal.
Right click on the barcode cell, and choose Specify font name and size. For DataBar Limited, DataBar Truncated and DataBar Stacked barcodes,
MRV DataBar 13Xshould be choosed. For rest of types,MRV DataBar 34Xis the best choice.
After selecting the bar code font, you should see the barcode appear. Adjust the column width and height so that the whole barcode is visible.
To create an entire column of barcodes, choose → with the barcode cell highlighted. Highlight cells you wish to add barcodes to and choose → . The formula will automatically adjust for the other cells.
To create a barcode in a Word mail-merge, we must insert a merge field from a data source that already formatted the text to the barcode font. In this example, we use Excel as the data source. The Excel spreadsheet data source must already be setup with barcodes just like the Excel Tutorial in this document.
In Word, Choose → → select the Excel spreadsheet for your data source. Be sure to select the columns and range for the cells that contain the data formatted to the barcode font. You may have to go through the Word mail-merge tutorial for assistance if you are unsure of how to connect to a data source or perform a mail-merge.
When connected to the data source, we insert the merge field of
FormattedTextinto the document. When we choose the option, we see the text formatted to the barcode font from the data source appear.Select the text in the merged data and choose the
MRV DataBar 34Xfont. Make the font 12 points in size.
