Table of Contents
The commands on the File menu allow you to create, save, close, print, export barcode files and exit Monterey Barcode Creator itself.

New
A new barcode drawing is created by using the command on the menu. When a new barcode drawing is created and displayed on the screen, the default properties are copied from a template file. You can specify the template file from Tools | Options menu. If no template file is present, the default settings are used. The default barcode drawing bears Morovia logo and copyright.
Open...
A saved barcode file can be redisplayed by using the Open command on the File menu.
A standard Windows File Open dialog pops up to allow you to explore the file system to locate the barcode file you want to open.
Save/Save As
When you open a barcode drawing, Monterey Barcode Creator loads the contents from the disk to the screen. Changes made to the barcode drawing are temporarily stored in memory until you save them to the disk.
Barcode drawings are saved with or command on the File menu.
If you use the command to save the barcode document and the selected barcode document is unnamed, the Save dialog will appear prompting you to provide a name. If you attempt to close the file to which you have made changes, you will be asked if you want to save the drawing. You can save the barcode file to any folder you want. In practice, we recommend you use a dedicated foler under My Documents folder and under the root disk drive.
We also recommend that you save your drawing often when making extensive changes, so that you avoid losing your work due to power outages or other unplanned events.
Export Image...
After you finish designing your barcode, you may desire to move the artwork to another program.
Monterey Barcode Creator supports the following graphics format: BMP, JPEG, GIF, TIF, PNG and EMF. The EMF (enhanced metafile) is a vector graphics format and used internally by Windows. All others are raster graphics formats.
If you export an image in a raster graphics format, such as JPEG, you need to be aware that raster image format does not hold all information, especially under a low resolution condition. A raster image can be though as a two-dimensional array of pixels, with each pixel containing the color information. Most of raster image formats do not have a field to specify the resolution information. As a result, you may need to specify the resolution when you export to another program.
The property of RasterImageResolution determines the resolution used when exporting to a raster image format. The default value of this property is
300.Print...
Monterey Barcode Creator has a built-in database with 1,500 known label paper products. Most likely the label paper you are using is already in the database; if it is not, you can always add it.
Click the Use Label Settings... button to activate the label paper list. Select the paper you are working with and check the appropriate printing options. Otherwise the barcode is printed on the top left side of the paper.
Print Preview
To see how a barcode drawing will appear when printed, use the Print Preview command on the File menu or click the Print Preview button on the toolbar. Print Preview will show you an exact replica of the printed chart on your computer screen. The Print Preview command is also available directly from the Print dialog.
The buttons along the top of the Print Preview window allow you to print and change the view of the chart.
Print Setup
To select the default printer, paper size, use this command.
Recent Used Files
The four most recently opened or closed barcode files are displayed at the bottom of the File menu.
To open one, you can either click it with the mouse, highlight it and press ENTER, or choose the number (with the File menu displayed) that corresponds to the one you want to open.

Copy
The copy command allows you to transfer the graphics to Windows clipboard. The format used is Enhanced Windows Metafile, a format which records the frame size. Most of Windows graphics programs support this format.
Although Windows Metafile is a vector format, many programs rasterize the drawing using the screen resolution. It may cause printing problems. If this is the case, save the file as Bitmap at a high resolution (ex. 300 dpi) and import the file into the graphics program.
Undo
The Undo command has the effect of undoing the last document property modification. If nothing can be undone, it displays in grey.
Redo
The Redo command reverses the last Undo operation.

The commands on the View menu toggle the Toolbars and Status Bar on and off.
Toolbars
The toolbars are found below the menu bar ot the top of the screen. Each of the button on the toolbars represents a frequently used command in the Barcode Creator. See Chapter 1 for detailed information about using the toolbars.
Monterey Barcode Creator V3.0 features three toolbars: Standard, Format and Border.
Status Bar
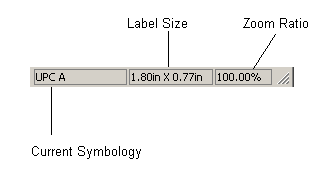
The Status Bar is at the bottom of the Barcode Creator application window. It provides a description of the currently selected menu command in the first pane. The next 3 panes on the right provide information about the current symbology, overall symbol size and the current zoom ratio.
To display the Status Bar
Choose the Status Bar from the View menu, so that a check mark appears.
To hide the Status Bar
Choose the Status Bar from the View menu, so that the check mark disappears.
View the current symbology
The current symbology information is found at the second pane of the Status bar.
View the overall symbol size
The symbol size is expressed in inch. It is located at the third pane of the Status bar.
View the zoom ratio
The zoom ratio information is located at the last pane of the Status bar.
Properties
This command toggles the display of the Properties Window.
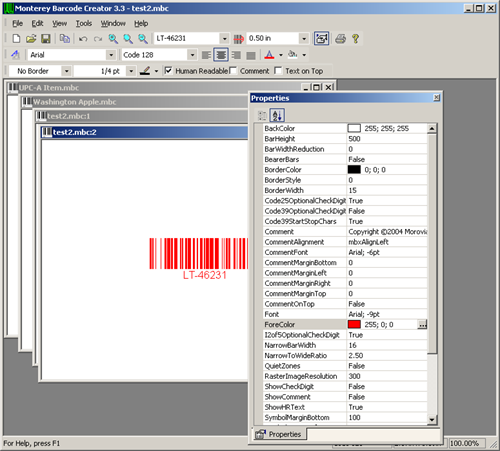
Monterey Barcode Creator 3 introduces a new window allowing you to fine control the barcode you created.
Use this window to view and change the design-time properties of the barcode object located in the designer window. Properties window is available from the View menu.
The Properties window displays different types of editing fields, depending on the needs of a particular property. These edit fields include edit boxes, drop-down lists, and links to custom editor dialog boxes. Properties shown in gray are read-only.
Zoom In / Zoom Out / Actual Size
The Zoom In and Zoom Out commands can be selected from the View menu or from the Standard toolbar. The Zoom Ratio is displayed in the Status bar.
The Zoom In command progressively zooms in on barcode drawing displayed on the screen. Each time the command is used, the more detailed the view of the barcode drawing.
The Zoom Out command changes the scaling to the previously zoomed state. For example, if you have used the Zoom In command to zoom in on the drawing four times, the Zoom Out command will take you back to the third zoomed view. Using it again will take you back to the second zoomed view, etc.
Rotate Left / Rotate Right
The Rotate Left and Rotate Right commands are selected from the View menu.
The Rotate Left command rotates the barcode drawing anti-clockwise in an increase of 90 degrees.
The Rotate Right command rotates the barcode drawing clockwise in an increase of 90 degrees.

The Options... command on the Tools menu allows you to configure the template file. It also lets you display or hide the Properties window.
Options
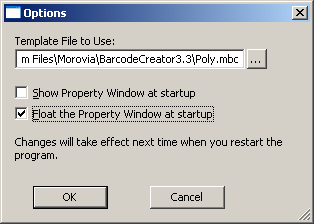
The Options dialog is used to configure the default template file to use when creating a new barcode. It also gives you options to configure the display attributes of the Properties window.
Template File to Use. Specify the template to use when creating a new barcode. All the properties of the template barcode are copied to the new barcode. This allows you to create multiple barcodes based on a common property set.
For example, you want to create 100 barcodes, each with a different number but all have the same comment and layout. You can create a barcode and save it into the disk. Then open the Options dialog and navigate to this file. After that all the new barcodes generated will have the same comment and layout.
Show Properties window at startup. Select this option to display the Properties window at the startup. The Properties window is hidden by default.
Float Properties window at startup. Select this option to make the Properties window float at the startup. Note that you must check the Show Properties window at startup too to display the Properties window.
The commands on the Window menu are used to control the layout of the drawings and icons in the Barcode Creator workspace. All commands are standard MDI (Multiple Document Interface) commands. For more information, visit http://msdn2.microsoft.com/en-us/library/ms644908.aspx.

New Window
Use the New Window command to create a new window of the current document. This feature is useful when you want to have different views present. For example, you can have a window showing 100% zoom ration and another one at 400%.
Cascade
Use the Cascade command to arrange all open windows in a cascade-like arrangment in the Barcode Creator workspace
Tile
Use the Tile command to arrange all open windows in a title like arrangement in the Barcode Creator workspace.

Arrange Icons
Use the Arrange Icons command to arrange all document icons at the bottom of the Barcode Creator workspace. A document is minimized by clicking on the minimize button on the top right corner of the window frame.
Document List
At the bottom of the Window menu, the names of each open document are listed. A check mark designates the currently selected document.
To switch between documents using the Window menu, click on the name of desired document. You can also switch between documents by simply clicking directly on the desired document in the Barcode Creator workspace. The selected document has a unique heading background.
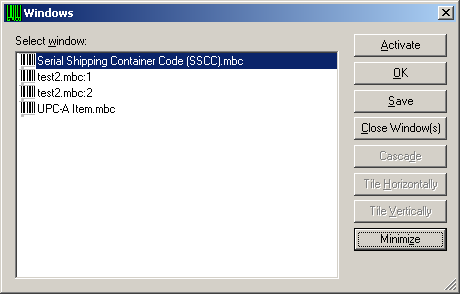
More Windows...
The last menu item is More Windows command, which pops up a dialog allowing you to activate, save, close or minimize any open window.
The quickest way to find out how a specific feature works in Barcode Creator is using the help system. The Barcode Creator's help system can be accessed by choosing Barcode Creator Help from Help menu.
The Monterey Barcode Creator User's Manual and the Help are based on the same material.

Help Topics
Use Help Topics command to view the online help. The help is in standard Microsoft HtmlHelp format. You can search by keywords, or read it topic by topic.
Morovia Web Site
Use this command to quickly access Morovia web site.
About...
The About command displays a window with information about your copy of the Monterey Barcode Creator, including the program version, build number, license to and registration code.
If you are using a trial version of the Monterey Barcode Creator, a register button displays. Press this button to pop up the registration dialog, from which you can type the registration information to convert your trial copy to the retail version.
Both
LicenseToandRegistration codemust match the ones appeared in the email we sent to you if you order online at Morovia WebStore or our affiliate shopping sites. Both fields must match. The registration information is written to the registry and checked every time you start the Monterey Barcode Creator.Note
Entering registrion information requires the current user having administrator privilege. If you are not a member of local administrators, you need to log on as an administrator to reigster the software.